Major Mayhem: running action game, great action, unlimited fun

Posted by Unknown Rabu, 31 Juli 2013 0 komentar
Let me start by telling you that Major Mayhem is a bit old game, I installed it some time back on my HTC Desire S. I thoroughly enjoyed playing this game completely, but as I was not completely done with it so, I decided to install it on my at that time new and shining Nexus 7 (well it is still shining :)). I must tell you it is even more fun to play this game on Nexus 7 as it is easier to target on the enemies and then because of Nexus 7’s big and gorgeous screen (1280 * 800 resolution) the scenes shown in this game look more interesting and beautiful.


Major Mayhem: The main screen
The main screen
Developed by Rocket jump games, it’s a running and shooting game, you play this game as a major who is on a 'one man army' mission to save his kidnapped girlfriend. The game starts with the president briefing major about his mission. There are three main tracks which are called worlds in the game as: Tropics, Metropolis and Desert, each world have 15 levels. As you play the levels and move forward, you start collecting coins by killing enemies. There are around 150 objectives and each has some reward (in terms of coins) associated with it, you achieve the objective you get the reward.


Major Mayhem: Three worlds for different experience
Three worlds for different experiences


Major Mayhem: Plenty of objectives and rewards
Plenty of objectives and rewards
The best thing about Major Mayhem is this game can be played completely till its end without spending any real money. All additional items in this game can be unlocked using the coins you earn while playing the levels.

It starts with the tropics world, where you ‘the player’ are dropped from a helicopter. You pass through huts, rivers, jungle etc. where ninjas are hiding and throwing weapons at you. Beware of the red ones, if you get hit by red ones thrice you die and that end the mission. To open fire at the enemies you just need to touch them.

Major Mayhem: The action begins in the tropics
The action begins in the tropics


Major Mayhem: Be alert, enemies are everywhere
Be alert, enemies are everywhere
As you complete the tropics world, you move to the Metropolis, where the enemies are sophisticated and are in suitsJ. You pass through building, swimming pools, and offices which have enemies everywhere, firing at you. The plan is to keep moving and completing the levels.


Major Mayhem: Shooting in the building
Shooting in the building
Done with Metropolis, welcome to the Desert, the last but the most difficult world.
Here you will face the usual enemies along with some deadly mummies. It takes lot many rounds of fire to eliminate a mummy. You will also face the mighty tanks and jets and it could be challenging to bring them down. If you have a better gun (my personal favourite is the minigun) it should be less difficult. Once you are at the last level you will face the main villain and it’s quite a surprise to see who it is. Let me know about it in the comments section once you reach thereJ.

Major Mayhem: Jet in action
Well, it's possible to bring down the jet
Once you have accumulated enough coins, you can visit the armory section where you can buy powerful guns, and then there are power-ups to choose and also a clothing section to dress up the major.

Major Mayhem: Major knows some cool tricks
Major knows some cool tricks


Major Mayhem: Waiting for the right time to attack
Waiting for the right time to attack


major Mayhem: The dangerous mummies
The dangerous mummies 

How much it costs you: Not a single penny.


Baca Selengkapnya ....

Cara Mudah dan Simpel Rooting Sony Xperia Z (Android 4.2.2) dengan DoomLord Easy Rooting Toolkit

Posted by Unknown Sabtu, 27 Juli 2013 0 komentar

 
Tutorial kali ini saya akan membahas cara rooting Sony Xperia Z dengan tutorial yag simpel bahkan bisa dilakukan oleh orang awam sekalipun. Sebelumnya apa sih itu rooting? Sebagian besar Android user pasti udah paham tentang rooting yaitu membuka akses system yang terkunci sehingga kita bisa memodifikasi system lebih bebas untuk lebih memaksimalkan kinerja smartphone android. Tutorial rooting ini bisa dilakukan di Xperia Z tanpa perlu unlock bootloader seperti seri Xperia lainnya. Prosesnya pun simpel dan tidak memakan waktu begitu lama hanya sekitar 2-5 menit. Untuk jaga-jaga, backup-lah terlebih dahlu data-data yang ada di internal untuk menghindari hal-hal yang tidak diinginkan (meskipun saja jamin resiko bricked sangat kecil sekali).

Persiapan:
  1. Sony Xperia Z (seri C6602 atau C6603) degan build number 10.3.A.0.423 Android 4.2.2 Jelly Bean firmware. Kamu bisa cek ini di Setting-About Phone
  2. PC/Laptop Windows untuk media rooting
  3. Download Sony Xperia Z USB driver for Windows dan install di komputer (untuk Windows 7 tidak perlu install sepertinya, karena USB telah dikenali langsung dengan system plug n play)
  4. Aktifkan USB Debugging di Xperia Z di Setting-Developer Option-USB Debugging. (Jika Developer Option masih tersembunyi, buka Setting-About Phone-lalu tap Build NUmber hingga 7 kali sampai menu Developer Option muncul dengan sendirinya.)
  5. Pastikan batre Xperia Z cukup penuh untuk menghindari low-battery di tengah-tengah proses.
  6. Easy Rooting Toolkit v15 by DooMLoRD (DooMLoRD_Easy-Rooting-Toolkit_v15_perf-event-exploit.zip | 1.98MB) Download bahan rooting ini.

      Instruksi

      1.  Ekstrak file DoomLord Easy Rooting Toolkit tadi di PC/Laptop. Kamu akan menemukan "files" folder dan "runme.bat"
      2. Pastikan USB Debugging dan Unknown Resources di Settings->Security->Unknown Sources telah dicentang
      3. Hubungkan Xperia Z ke komputer/laptop dengan kondisi meyala (ON)
      4.  Buka file :runme.bat yang telah di-download tadi.
      5. Ikuti saja instruksinya, tekan tombol manapun di PC/laptop untuk melanjutkan proses. Tunggu sampai proses selesai (tidak sampai memakan waktu lebih dari 5 menit).
      6. Xperia Z secara otomatis akan restart ketika proses rooting di PC telah selesai.
      7. Pastikan di daftar menu Xperia Z milikmu terdapat icon app SuperSU.  Selamat! Akhirnya proses rooting Xperia Z telah berhasil dilakukan.

      Baca Selengkapnya ....

      3G Watchdog: Great app to keep track of your 3G or WiFi data usage

      Posted by Unknown Kamis, 25 Juli 2013 0 komentar
      A smartphone is a powerful medium to gain knowledge by allowing users to access informative websites, to pass time by allowing to download games, apps, movies, songs etc., but at the same time it is a great tool to incur heavy data usage (internet) charges if user is not carefully paying attention to it. I know you keenly follow my blog and download the apps and games I have written about on my blog posts :), but at the same time you are consuming your quota of your internet plan (3G, Wi-FI etc.). No need to worry, there are apps and tools available on Google Play store to monitor and control the data usage.

      3G Watchdog is one of best utility app for tracking your data usage. Well, it may not appeal to the smartphone users who are on an unlimited data plan as probably they do not need to care about the usage, but for mere mortals like me, it is important to track the data usage. Important because, everything which is related to money is important, you see :).

      Before going into details of 3G watchdog app, let me tell you that starting from Android 4.0 (Ice Cream Sandwich), Google introduced a feature to help user to track and see the internet data usage. This option can be accessed by choosing ‘Usage’ from ‘Settings’ menu. It shows a nice graphical representation of data usage and below that one can find apps-wise breakup of it. User can select time window to see the data usage for both 3G (Cellular) and Wi-Fi. All this is good, but it is still a bit cumbersome to use, as it does not provide any widget to quickly check the current data usage stats if you are not much interested in seeing whole lot of details. 3G Watchdog comes handy in such situation, and can be used just for that.

      Android: Data Usage graphical representation
      Data Usage graphical representation


      Android:App-wise breakup of data usage
      App-wise breakup of data usage
      3G Watchdog is a simple looking yet a useful and well-built app. The basic purpose of this app is to track your Internet data usage be it 3G or Wi-Fi; and it does that just perfectly.  

      To use this app, first you need to provide few details about your data plan from app's settings menu, where it allows you to:
      1. set your download quota as per your data plan and the unit of cycle like per month
      2. instruct 3G Watchdog as to when it should start warning you once you have consumed a specific % of your quota
      3. set the refresh frequency for notification and widget (more in the later part of the post)
      4. specify when it should show the notification icon in the notification bar
      3G Watchdog: Specifying the update frequency
      Specifying the update frequency

      3G watchdog: Specifying the data plan details
      Specifying the data plan details
      That's it, 3G Watchdog is ready to monitor your data usage. You will see a notification icon in the notification bar as well as a permanent item in notification area. Selecting the notification will launch the app and present you the summary stats of your 3G data usage and below that, details of it in a table format. Where columns represents 'Received', 'Sent' and 'Total' data, and row represents the monitoring period like 'Today', 'Week', 'Month' etc.


      3G Watchdog: App Showing your 3G data usage pattern
      Showing your 3G data usage 
      To see the Wi-Fi usage select the respective tab located just above the table.


      3G Watchdog: App Showing your Wi-Fi data usage pattern
      Showing your Wi-Fi data usage
      By long pressing on the 'Today' row you can choose to see the day wise details of the data usage.


      3G Watchdog: Showing day-wise data usage
      Showing day-wise data usage
      And finally, it provides two widgets of different sizes showing the Quota usage in actual numbers as well as % wise, and one widget to enable / disable the mobile data network. This enables the user to quickly check the data usage without even launching the app.


      3G Watchdog: Widgets options to choose
      Widgets options to choose

      How much it costs you: Not a single penny. 

      A paid version is also available (3G watchdog Pro) with added features like roaming data usage, usage history with graphs, few more widgets, usage by application etc.


      Note: From this post onward I will be using this text size, as I think it looks better. 

      Baca Selengkapnya ....

      Download Factory Images Android 4.3 untuk Galaxy Nexus, Nexus 4/7/10

      Posted by Unknown Rabu, 24 Juli 2013 0 komentar

      Baru diumumkan tadi malam (24 Juli 2013), Factory images Android 4.3 udah tersedia dan  bisa langsung diunduh. Jangan senang dulu, karena update Android 4.3 ini baru bisa dinikmati anak-anak emas Google yang berlabel Nexus terbaru yaitu Galaxy Nexus (yang ini paling tua), Nexus 4/7/10

      Android 4.3
      Update ini dapat diunduh di sutus Google Developer, dimana maisng-masing ROM sudah dikategorikan sesuai dengan jenis perangkat Nexus-nya. Instalasinya saat ini hanya bisa dilakukan secara flashing manual, bukan via OTA updates langsung dari perangkat. So, kumpulkan keberanianmu untuk ngoprek dan segala resikonya tentu ditanggung oleh pemilik. Siap?

      Berikut ini list ROM Android 4.3 yang bisa diundung langsung. SSesuaikan dengan perangkat Nexusnya, jangan salah yaa:
      • Factory Image “mantaray” for Nexus 10Android 4.3 (JWR66V) / MD5 Checksum: f80f2251356388b7151ac817cfada671
      • Factory Image “occam” for Nexus 4Android 4.3 (JWR66V) / MD5 Checksum: 9d33973a61fa9266244fc43397888703
      • Factory Images “nakasi” for Nexus 7 (Wi-Fi)Android 4.3 (JWR66V) / MD5 Checksum: 77e304584c4f192761234a9e1eb2fbe3
      • Factory Images “nakasig” for Nexus 7 (Mobile)Android 4.3 (JWR66V) / MD5 Checksum: 0f426a1981338b637aa12ff7bbd197be
      • Factory Images “takju” for Galaxy Nexus “maguro” (GSM/HSPA+) (with Google Wallet)Android 4.3 (JWR66V) / MD5 Checksum: 6fcb316e2ce5226e1d0397b74c50db50
      • Factory Images “yakju” for Galaxy Nexus “maguro” (GSM/HSPA+)Android 4.3 (JWR66V) / MD5 Checksum: b771c16592ab447c4fe91f0c5436ca11
      Instalasi Android 4.3:
      Untuk install ROM ini, kamu butuh adb/fastboot di komputer dan flashing/instalasi ROM ini ke perangkat androidmu. Setelah selesai mengunduh ROM Anroid 4.3, cari adb/fastboot installer, yang mana dapat kamu temukan dengan mudah di forum XDA dan ikuti instruksinya. Bingung? Google adalah teman yang paling tepat menuntaskan kebingunganmu dalam ngoprek Android. Selamat menikmati!


      Baca Selengkapnya ....

      Apa Yang Baru di Android 4.3?

      Posted by Unknown 0 komentar
      http://static.ibnlive.in.com/ibnlive/pix/sitepix/07_2013/android-43-jelly-bean-240713.jpg

      Semalam (24 Juli 2013), Google akhirnya ungkap misteri versi Android terbaru yang sempat bikin kecewa beberapa android holics karena tidak diumumkan di ajang Google I/O 2013 pada Mei lalu. Ya, versi Android terbaru ini adalah Android 4.3. Masih usung angka "4", versi Android terbaru ini tak lain adalah varian Jelly Bean. Gila ya, Jelly Bean sampe 3 versi lho (4.1, 4.2, 4.3). Lalu apa fitur-fitur terbaru yang diusung si permen manis ini?

      1. Kontrol akun pengguna dengan Restricted Profiles
      What's New in Android 4.3 Jelly Bean

      Di Android 4.2, Google menambahkan fitur multiple user dimana dalam satu perangkat Android bisa digunakan oleh lebih dari 1 orang dengan penyimpanan setting yang berbeda-beda pula. Nah di Android 4.3 ini, pengguna devices Android dapat membuat Restricted Profiles yang dapat membatasi akses untuk beberapa task apps tertentu yang mana dapat pengguna lakukan di profil lain. Sebagai contoh, pengguna dapat mencegah anak-anaknya untuk tidak mengakses apps berbayar. Kamu nggak ingin kejadian anak kecil pake gadget bokapnya terus beli apps berbayar hingga tagihannya membengkak terulang lagi kan kayak di platform buah sebelah? Hahahaha. Gue ketawa puas. Google sedikit lebih inovatif.

      2. Akses Kontak Lebih Mudah Berkat Dial pad Auto Complete
      Fitur ini mungkin telah ada di beberapa handphone Android. Tapi untuk versi Android stock tanpa embel-embel kustomisasi UI bawaan vendor, fitur ini baru diusung dan memudahka pengguna untuk akses kontak dengan cepat.

      3. Bluetooth dapat Pairing dengan Perangkat Low-Power Berkat Bluetooth Smart Low Energy
      What's New in Android 4.3 Jelly Bean
      Google menambahkan fitur terbaru Bluetooth versi 4.0 di Android 4.3 yang mengijinkan perangkat untuk pairing dengan perangkat lain yang memiliki power rendah. Kabar baik untuk beberapa orang yang menggunakan perangkat semacam fitness sensor dll.Smart watch & Smart Glass pasti juga butuh pairing via Bluetooth ini.

      4. Always On Wifi Scanning
      Di Android 4.3, perangkat androidmu dapat mencari akses wifi terdekat dari lokasi tapi dengan mode pasif yang tidak menghabiskan banyak konsumsi baterai meskipun dalam mode standby. Tapi untuk lebih menghemat lagi, kamu juga bisa matikan fitur ini di setting

      5. Standar Grafis Open GL ES 3.0
      Google memberikan dukungan standar OpenGL ES 3.0 di sistem operasi Android 4.3 Jelly Bean terbarunya. Standar OpenGL ES 3.0 ini adalah standar yang berkaitan dengan animasi grafis 3D dan gaming yang memungkinkan peningkatan kualitas grafis game 3D melalui berbagai efek-efek grafis baru yang menakjubkan. Ya, bisa dibilang platform Android makin mantap terjun ke dunia gaming kelas atas ke depannya.


      6. 1080p Streaming dan DRM API

      Fitur 1080p streaming dan DRM API ini memungkinkan perangkat dengan sistem operasi Android 4.3 Jelly Bean untuk melakukan streaming video full HD 1080p yang dilengkapi dengan DRM API. Fitur ini mendapat dukungan dari layanan Netflix.

      Baca Selengkapnya ....

      Beach Buggy Blitz : A fantastic racing game which will transport you to a stunning island, that too for free

      Posted by Unknown Jumat, 19 Juli 2013 0 komentar
      This is one of the games I am currently playing almost every day. I like racing games as much as the FPS shooting games, but it is a different racing game. While playing Beach Buggy Blitz you will feel like you are roaming on a lonely island with pristine water and beaches. Playing this game simply reminds me of my trip to the Island country of Vanuatu.

      Even if you are not interested particularly in racing, the surrounding, visuals and locations shown in this game will definitely amuse you. Enough talking :), let's see what this game is all about.


      Beach buggy blitz the racing game: Opening screen
      The opening screen
      Created by the company Vector Unit, Beach Buggy Blitz racing game is set on an island. This game is supported on all my devices, but I chose to install it on my Nexus 7. This was done for the obvious reasons as the sheer power of the Nexus 7 hardware and its great display but importantly due to its NVIDIA Tegra processor, as this game has some specials effects exclusively for it.


      Beach buggy blitz the racing game: The home screen
      The home screen
      The home screen shows the options to choose cars from the garage, choose the character and modification options and power ups. You can get a 360 degree view of the car as well as the surroundings. Also you can see your high score and the coins you have in your kitty.

      Beach buggy blitz the racing game: The character options
      Characters options
      In this racing game a pumpkin or bunny or skeleton can be your rivals :), and you can also unlock these characters through the coins you earned. Do not underestimate your rivals, they can dash your vehicle or block your way and make sure you do not go ahead of them.


      Beach buggy blitz the racing game: The vehicle options
      Vehicles options
      At start there is only one car available to you and you can unlock the other 6 vehicles using the coins. There are various tuning and modifications options available to beef up your vehicle. Changing the vehicle color and decal is also possible.

      Beach buggy blitz the racing game: Driving the car on beach
      Driving the buggy by the beach
      The controls are very simple and sensitive, I chose the tilt control and it took some time to get used to it. As the race starts, you will see yourself driving the car on the beach, passing through the palm trees, huts, boats the giant crabs and seagulls on your way. It is best to avoid these obstacles, because hitting them will slowdown your speed. There is a clock ticking at the top left hand of your screen and you must reach to the next checkpoint before it shows 0 to get a new lease of life in the form of few seconds. On the way you also get coins, speed boosters, health shields as bonus.

      The race take you through some stunning and beautiful locations like wooden walkway bridges, mysterious caves and let you jump from frightening heights. Have a look at some of the views.


      Beach buggy blitz the racing game: Impressive visuals
      Impressive visuals


      Beach buggy blitz the racing game: Driving in the cave
      Driving in the cave with headlights ON


      Beach buggy blitz the racing game: On snowy mountain
      Recently I explored the snowy mountain

      How much it costs youNot a single penny.

      If you like this post or know any other app / game in the same category, let me know via comments.
      To get notification about the new posts on this blog, do not forget to subscribe to this blog through email subscription option from the side bar.


      Baca Selengkapnya ....

      How to take a screenshot on: Nexus 7, HTC Desire S

      Posted by Unknown Rabu, 17 Juli 2013 0 komentar
      Android supports taking screenshot without the use of any third party app starting from 'Ice Cream Sandwich' (4.0). Still, the combination of buttons for taking screenshots is different for different devices.


      Taking the screenshot on Nexus 7

      This can be done by pressing the 'Power key' and the 'Volume down key' simultaneously for couple of seconds. I was following the instructions mentioned on Google Nexus 7 help page: https://support.google.com/nexus/7/answer/2811098?hl=enbut as I was releasing the buttons combination immediately, the screenshot was not getting captured. Remember, you need to keep it pressed for couple of seconds until you see a brief animation.

      The just taken screenshot can be accessed from the notification bar, or from the photo gallery where it gets stored.

      Taking the screenshot on HTC Desire S


      This can be done by pressing the 'Power key' first and then immediately the 'Home key'. If the operation is successful you will hear the camera click sound and a message on the screen.

      The just taken screenshot can be accessed from the 'Camera shots' album in the photo gallery.

      I guess the procedure should be the same for other models of HTC.


      I have not looked into the screenshot procedure for Android devices from other manufactures, if anyone of you is aware, appreciate if you can add it in the comments section to help others.


      See also:

      Other tips:

      Nexus 7 not booting up

      Baca Selengkapnya ....

      Solusi Camera Failed di Samsung Galaxy Series

      Posted by Unknown Selasa, 16 Juli 2013 0 komentar
      Pernahkah hp android kamu (Samsung Galaxy) mengalami problem "Camera Failed" saat membuka aplikasi kamera untuk mengabadikan moment-moment penting? 

      Ya, problem ini sering sekali dialami oleh pengguna hp android khususnya Samsung Galaxy. Entah ini rasis apa bukan, tapi memang problem ini jarang sekali dialami oleh pengguna android non Samsung (kecuali aklau problem bawaan Custom ROM unofficial).Problem ini lebih ke masalah software dari kamera itu sendiri. Cara paling gampang untuk mengatasinya adalah dengan update software karena bisa jadi Samsung berikan patch/bug fixed untuk masalah yang sangat sering dialami oleh penggunanya ini. Nah kalo belum tersedia juga update software resminya dari Samsung gimana?
      Ada beberapa hal yang bisa kamu lakukan
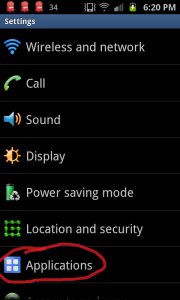
       1. Pertama, masuklah ke Setting dan pilih Applications

      How to fix camera failed, step 1

      2. Dari Applications menu, pilihlah Running Servces untuk mengetahui apa sajakah aplikasi yang berjalan di RAM saat itu

      How to fix camera failed, step 2

      3.  Ketika daftar Running Services terlihat, pilih Menu lalu tampilkan Show Cached Process. Pilih Show Cached Processes.

      How to fix camera failed, step 3

      4. Scroll daftar apps yang terdapat dalam cached processes lalu pilih Camera App
      How to fix camera failed, step 4

      5. Ketika kamu memilih Camera process, lihatlah di bagian awah ada pilihan Stop It. Pilih Stop akan menghentkan secara paksa proses Camera yang berjalan.

      How to fix camera failed, step 5

      6.  Setelah memberhentikan proses cache Camera, kembali ke homescreen dan coba buka Camera atau apps lain yang berhubungan dengan kamera di androidmu. Biasanya notifikasi "Camera Failed" tidak lagi nongol setelah kamu lakukan step step diatas. Selamat mencoba :)

      Baca Selengkapnya ....

      Trik Kendalikan Gadget Android dengan PC via Koneksi Wifi

      Posted by Unknown 0 komentar
      Kadang ada saat - saat tertentu dimana kita tidak bisa membawa HP Android kesayangan kita, sementara kita masih membutuhkan file - file yang ada dalam HP Android kita itu. Dalam kondisi sepertii ini kita memerlukan akses jarak jauh untuk membuka atau mengambil file tadi, terus bagaimana caranya ? pada kondisi tertentu kita juga perlu memindahkan file dari HP Android ke laptop atau komputer namun kabel datanya dipinjam oleh teman atau ketinggalan di kantor, lalu apa yang harus kita lakukan ? apakah ada cara lain ?
      Jawabannya bisa ! pada awal era tahun 2000-an (awal era milenium) santer diperbincangan yang disebut    dengan cloud computing, dimana kita bisa mengakses file dari mana saja kita berada. Salah satu manfaat dari cloud computing ini bisa kita rasakan juga melalu HP Android yaitu melalu aplikasi yang bernama Airdroid, dengan Airdroid kita bisa mengakses HP Android melalui jaringan internet maupun jaringan lokal Wi Fi.

      Sebenarnya banyak aplikasi lain yang bisa digunakan untuk remot/kendali jarak jauh HP Android, tapi kali ini kita hanya akan membahas aplikasi Airdroid. Airdroid bekerja seperti aplikasi VNC (Virtual Network Connection) pada komputer dimana Airdroid bekerja sebagai server VNC pada HP android sehingga kita bisa melakukan kopi, download, explore bahkan melakukan fungsi dari fasilitas yang ada pada HP Android, seperti kirim SMS, Telepon, Mengambil Foto dan Screen Shot. Untuk lebih jelasnya berikut ini cara konfigurasi Airdroid untuk remot control dengan komputer via jaringan Internet dan Wi Fi :

      Syarat & Ketentuan
      • HP bisa terhubung dengan PC lewat jaringan lokal (WiFi) atau internet.
      • Untuk mengambil screen shot dibutuhkan root akses
      • Browser pada PC yang suport java
      • OS Android versi 2.1  ke atas

      Langkah  Instalasi
      1. Hubungkan HP dengan komputer melalui WiFi atau nyalakan jaringan internet di PC dan HP anda.
       

      2. Jalankan aplikasi Airdroid, jika belum terinstal download dan instal dari playstore.
       

      3. Buka browser pada PC anda dan masukan alamat web Airdroid jika anda terhubung lewat internet atau masukan alamat IP dan port-nya jika anda terhubung lewat WiFi. 

      4. Jika menggunakan koneksi internet anda harus memiliki akun airdroid atau anda bisa login menggunakan akun google, facebook atau twitter, selain itu koneksi internet pada PC dan HP harus bagus. Jika sudah terkonesi anda bisa mulai mengakses file - file anda lewat PC atau laptop.


      Selamat mencoba :)

      Sumber: Android4mi

      Baca Selengkapnya ....

      USB Driver Berbagai Seri Perangkat Android

      Posted by Unknown 0 komentar
      http://itechbook.net/wp-content/uploads/USB-Drivers.jpg
      Pernahkah gadget android kalian saat dihubungkan ke PC/Laptop Windows via USB tidak terbaca? Tidak terdeteksi? Tenang, tidak ada yang error kok pada gadget android kalian. Permasalahan utamanya, Windows tidak bisa membaca data-data yang tersimpan di gadget android baik itu di internal maupun eksternal (SDCard) karena driver gadget tersebut belum terinstall dalam system Windows itu sendiri. Pada dasarnya, tiap hardware yang dikoneksikan ke PC Windows tentunya butuh prosedur instalasi driver sebagai "perkenalan".

      Nah mengingat gadget android itu dibuat oleh banyak vendor seperti Samsung, Sony, LG, Motprola, hTC, Huawei, dll, tentunya kita tidak bisa terpatok pada satu driver saja, melainkan harus disesuaikan dengan tipe masing-masing vendor. Agar tidak bingung, saya akan berikan list USB driver masing-masing vendor Android agar Windows dapat mengenali gadget android kalian:
      Silakan unduh file driver sesuai dengan gadget android kalian di PC/laptop Wndows. Setelah itu gadget android kalian akan dapat terbaca via USB dan dapat mengelola data-data didalamnya dengan teratur. 

      Baca Selengkapnya ....

      How to Optimize Blogger Post Title with H1 Tag For Better SEO

      Posted by Unknown Jumat, 12 Juli 2013 0 komentar
      Optimize Blogger Post title:Heading Tags plays an Important role in search engines results as they tends to find out what is important in your Blog content.However, heading can make your Blog SEO friendly if they are tagged H1.In this regard, there are several Templates which can provide you Built in SEO tricks like this, But it is good to say, "Everyone has his own self respect".
      So, without changing the Template for this Trick, we are going to teach you a Tutorial, To Optimize Blogger Post Title With H1 Tag For better SEO results.
      How-to-optimize-blogger-post-title-with-h1-tag-for-better-search-results 

      Role of H1 Tag in Heading:

      H1 Tag in Heading plays an Important role,such as the Keyword place inside these Headings are easily Optimize by Search engines.Header Tag finds in Blogger Ranges from H1 to H6.So Today we are going to change H2,H3 to H1 for Better SEO results.

      How To Optimize Blogger Post Title With H1 Tag

      • Sign up to your Blogger Dashboard.
      • Go to your site click on the Template Tab.
      • Backup your Template.
      • Now click on the Edit HTML Tab.
      • Proceed it,
      • Find the Following code over there by Pressing (CTRL+F).
      <b:if cond='data:post.title'> <h3 class='data-title entry-title'>
      <b:id cond='data:post.link'>
      <a expr.href='data:post.link'><data:post.title/></title>
      <b:else/>
      <b:if cond='data:post.url'>
      <a expr.href='data:post.url'><data:post.title>
      <b:else/>
      <data:post.title/>
      </b:if>
      </b:if>
      </h3>
      </b:if>
      • Now replace the Above code with the Below H1 Tag.
      <b:if cond='data:post.title'> <h1 class='data-title entry-title'>
      <b:id cond='data:post.link'>
      <a expr.href='data:post.link'><data:post.title/></title>
      <b:else/>
      <b:if cond='data:post.url'>
      <a expr.href='data:post.url'><data:post.title>
      <b:else/>
      <data:post.title/>
      </b:if>
      </b:if>
      </h1>
      </b:if>
      • Heading H1 is too Large, and it might look Bad.
      • So add the following Code above the Skin Tag. ]]></b:skin>
      h1.post-title, .post h1 #Blog1 h1, #Blog2 h1 { font-size:1.5em;
      }
      •  Simply save your Template, You have done this Tutorial.
      If you find any difficulty contact us through the comment box we will help you.

      Baca Selengkapnya ....

      Clay Jam: A unique game with lots of clay and fun

      Posted by Unknown Kamis, 11 Juli 2013 0 komentar
      Clay Jam has a refreshingly different game play. Though I must admit, it appeals to kids more than the grown ups. It gives a feeling like you are playing with colorful clay all the times.
      Everything in this game appears to be made of clay of different colors, be it the background or text or game characters.


      Clay Jam: The initial screen
      The initial screen
      The plot of the game is divided into 5 different types of level. 
      Each level has a hill which is occupied by a beast and the mission is to defeat the beast with the help of a rolling pebble.


      Clay Jam: The hill
      The hill
      Each level has some unique quests which should be fulfilled to complete the level. Quest could be like to squash only specific types of creatures in a row or reach to the bottom of hill without hitting anything etc.  


      Clay Jam: The quest
      The quest
      The game starts with a small pebble rolling on the clay hill. On its way you find some creatures made of clay roaming around, which should be squashed so that the clay gets rolled on the pebble causing it to become bigger in size. The idea is to smash as many creatures to get a bigger clay ball. The player guides the pebble by sliding her finger on it in the direction of the creatures or away from the walls.


      Clay Jam: The pebble and the creatures
      The pebble and the creatures
      Once the pebble reaches at the bottom of the hill the beast can be seen. At this time the pebble should be rolled as faster as possible so that it hits the beast hard and throw it farther the hill. For best results the pebble should be bigger in size.


      Clay Jam: The beast
      The beast
      Power packs are available to enables the player to collect more clay easily by converting the pebble bigger in size, or set it on fire etc. 


      Clay Jam: Power pack in action
      Power pack in action
      Well, you can not just keep on squashing the creatures to collect the clay, there is molten lava coming behind, and if the player do not move the pebble ahead quickly, the lava will swallow the pebble and game will be over.

      So go ahead and play with the clay.


      Clay Jam: The end is approaching
      The end is approaching
      How much it costs youNot a single penny.


      Baca Selengkapnya ....
      Trik SEO Terbaru support Online Shop Baju Wanita - Original design by Bamz | Copyright of android nexus 7.